
The pickleball ready position is the athletic, pre-loaded stance you must return to between every single shot. Think of it like an infielder’s crouch in baseball or a boxer’s defensive posture—a coiled, dynamic frame that allows you to explode in any direction the millisecond the ball is hit.
Whether you are grinding out a point at the baseline or locked in a fast-paced hand battle at the kitchen line, resetting to this position is the ultimate separator between recreational players and advanced competitors.
Crucial Concept
The ready position applies anytime you are not actively swinging—including the split-second immediately following your own shot. Resetting your stance must become a subconscious instinct.
Quick Summary
-
The Base: Feet shoulder-width apart (or slightly wider), weight balanced on the balls of your feet.
-
The Springs: Knees bent at a slight, sustainable 10 to 15 degree angle—never a deep, fatiguing squat.
-
The Weapon: Paddle held at belly-button to chest height, angled toward the 11 o’clock position (for righties) with a relaxed, flexible wrist.
-
The Trigger: A micro-hop split step timed perfectly to land right as your opponent makes contact with the ball.
How to Execute It: The Top-to-Bottom Guide
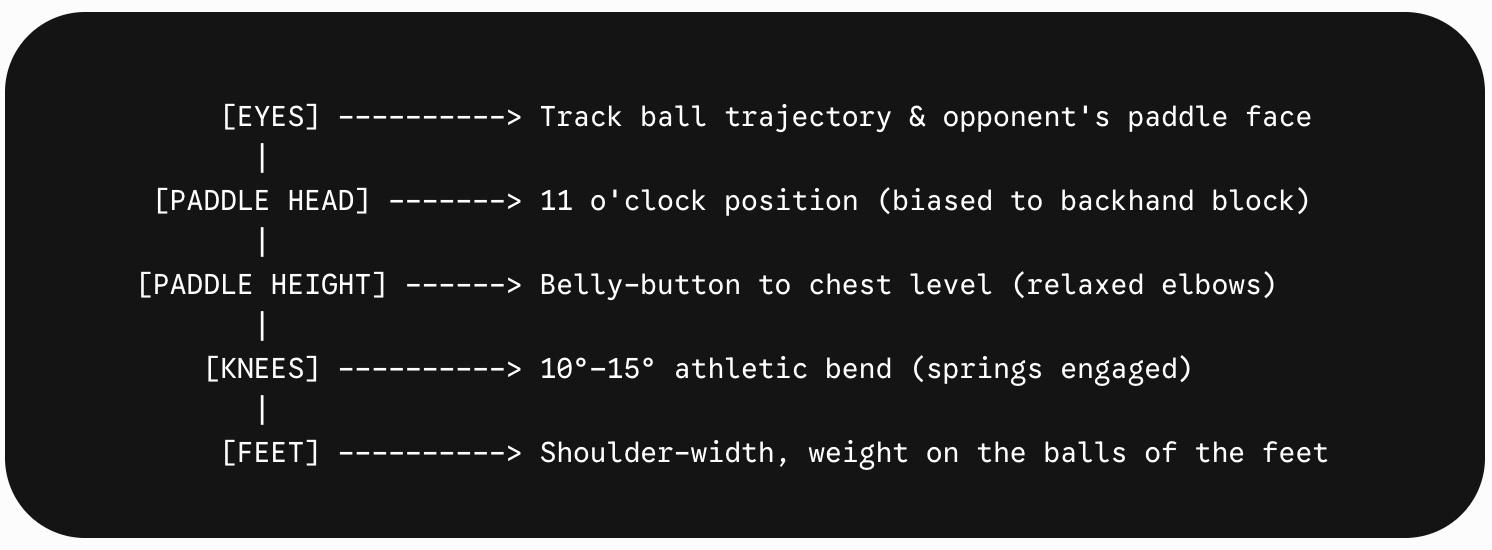
1. Set Your Base [Feet]
Establish a foundation with your feet positioned shoulder-width apart, or slightly wider. Shift your body weight forward onto the balls of your feet. If your heels are glued heavily to the court, your lateral movement will suffer.
2. Engage the Springs [Knees & Hips]
Bend your knees just enough to activate your quads, hamstrings, and glutes. Mechanical breakdowns of optimal court movement show that a 10 to 15 degree knee bend provides the perfect balance of explosive mobility without causing premature leg fatigue. Avoid a deep squat, which locks up your joints and drains your energy.
3. Position the Weapon [Paddle & Grip]
Hold your paddle out in front of your body with relaxed, slightly bent elbows.
-
The Height: Keep the paddle between belly-button and chest height.
-
The Angle: Use the Clock Face Rule. Imagine facing a giant clock. If straight up is 12 o’clock, right-handed players should point the head of their paddle toward 11 o’clock (left-handed players point to 1 o’clock). This biases your posture toward a backhand block, which allows you to cover roughly 75% of your body in quick exchanges.
-
Grip Pressure: Maintain a relaxed 3 out of 10 grip pressure. Tense muscles move slower; loose wrists react faster.
4. Lock Your Radar [Eyes]
Do not track your opponent’s feet or body shape. Lock your eyes onto the ball and the face of your opponent’s paddle. The angle of their paddle face reveals exactly where the ball is going before it ever leaves their strings.
5. Trigger the Load [The Split Step]
Right before your opponent strikes the ball, execute a tiny, low-profile hop. You want to land on the balls of both feet exactly as the ball makes contact with their paddle. This turns a static posture into dynamic, explosive momentum.
The Biomechanics: Why These Positions Matter
Eliminating Reaction Delay
Standing tall with straight legs or letting your paddle drop to your thighs introduces a measurable delay into your game. Muscles must mechanically contract and load before they can expand. By maintaining a 10 – 15 degree bend, your muscles remain pre-loaded and ready to fire instantly.
The 15% to 19% Speed Advantage
Sports science research tracking player movement patterns in racket sports proves that utilizing a timed split step provides a 15% to 19% increase in lateral acceleration and redirection speed. In a game like pickleball—where kitchen exchanges are decided by fractions of a second—this advantage is massive.
Symmetrical Court Coverage & The "Out-Ball" Rule
Positioning the paddle at belly-button height gives your arm a perfectly symmetrical travel distance to protect both low dinks and chest-high attacks.
Furthermore, this height acts as a built-in baseline for tracking out-balls. Because of the downward trajectory required to keep fast attacks in bounds, any ball struck from the opponent's kitchen line that forces you to reach above your shoulders is highly likely sailing out of bounds. If your paddle is already up, you can easily read the height and let it fly past.
The "See-Saw" Principle at the Kitchen Line
While belly-button height is the ultimate default, advanced players utilize the See-Saw Principle at the Non-Volley Zone (NVZ) line:
-
If your opponent's paddle goes low to dig out a tough dink, your paddle should shift slightly higher to prepare for a desperate speed-up flick.
-
If your opponent catches a ball high off a popup, your paddle should drop lower toward your knees to prepare to defend a heavy downward smash.
Common Mistakes & The Cost
| Technical Mistake | The Penalty | The Instant Fix |
|---|---|---|
| Standing completely upright | Forces your knees to bend after the ball is hit, adding a severe delay to your reactions. | Drop into a 10-15 degree athletic bend before the serve; check your height whenever you feel sluggish. |
| Dropping the paddle to the thighs | Leaves your chest and backhand completely exposed to sudden speed-ups. | Reset the paddle to your belly button the exact millisecond your own swing concludes. |
| Settling weight onto the heels | Traps you in place, causing you to feel consistently late to wide volleys. | Rock forward slightly so a piece of paper could slide beneath your heels between shots. |
| Skipping the split step | Leaves legs completely unweighted, sacrificing the proven 15%–19% lateral speed boost. | Time a micro-hop to land perfectly in sync with your opponent’s contact point. |
Frequently Asked Questions
How low should my knee bend actually be?
Aim for a slight, active athletic hinge—roughly 10 to 15 degrees. If your thighs are burning or fatigued within the first ten minutes of play, you are dropping into an unnecessary, deep squat.
Why does my paddle keep dropping to my waist during a match?
This is almost always caused by mental fatigue rather than a lack of physical ability. To fix it, connect your paddle reset to your teammate’s shot. Make a mental rule: the moment my paddle finishes a swing, it immediately snaps back to my belly button.
Is the ready position different at the baseline versus the kitchen line?
The core lower-body posture stays identical. However, your footwork intensity shifts. At the baseline, you need wider, more explosive lateral movement. At the kitchen line, you want quiet, stable feet combined with highly active, relaxed hands to handle rapid-fire volleys.
Next Posts
How to Choose Your Pickleball Stance in Real Time
How to choose your pickleball stance mid-point — using ball depth, available time, and your next move to pick closed, semi-open, or open instantly.
The Unit Turn in Pickleball
The pickleball unit turn explained — rotating hips, shoulders, and non-paddle arm together as one unit, with the exact turn-pause-step-swing sequence.
Pickleball Kinetic Chain
The pickleball kinetic chain explained — the legs-to-paddle power sequence that separates effortless drives from arm-only swinging.
continue reading
Related Posts
Why lunging in pickleball costs you balance and recovery — and the exact distance thresholds for when to use a small step versus a shuffle versus a crossover.
Pickleball footwork at the kitchen line explained — why quiet, grounded feet paired with active hands beats either standing still or constant shuffling.
Learn the exact pickleball footwork patterns needed to master the baseline, transition zone, kitchen line, and wide-angle defense. Stop dropping points due to poor movement.